Camping Mobile Hotspot Setup: Stay Connected at Campsites
Introduction
Don’t let the wilderness cut you off from the world! A good camping mobile hotspot setup keeps you connected while enjoying nature. Need to call home? Want to work remotely? Just want internet for emergencies? A mobile hotspot can do it all.
A recent survey shows 65% of campers now see internet as a must-have – way up from five years ago! This guide covers everything about camping mobile hotspot setups. We’ll help you pick the right gear and get the best signal in remote spots. For more comprehensive information on connection options, check out HighSpeedInternet.com’s Guide on Getting Wi-Fi While Camping.
Understanding Mobile Hotspots for Camping
The first time I used my phone as a hotspot while camping, it failed badly. I just wanted to share some photos with family. All I got was that spinning wheel on my screen. I knew nothing about mobile hotspots in remote areas.
After many camping trips, I know how to stay connected far from cities. It’s not just about turning on your hotspot and hoping. You need a plan for your camping mobile hotspot setup.
Here’s what matters for camping hotspots:
4G vs. 5G: 4G often works better in rural areas. At the Grand Canyon, my friend’s older 4G phone had better signal than my new 5G phone. This happens because 4G towers reach farther into remote places.
Battery life: My phone died in just 2 hours the first time I used it as a hotspot. Now I always bring a big 20,000mAh power bank for my camping mobile hotspot setup. It’s been a lifesaver many times.
Data limits: Phone companies often limit hotspot data even with “unlimited” plans. I thought my plan would last all weekend. I was wrong and got slow speeds by Saturday. Always check your hotspot limits before your trip.
Signal boosters: My WeBoost Drive X cost $399 but makes my wilderness wifi reach 2-3 times farther. It’s worth it if you camp often.
Placement matters: Putting your phone about 6 feet off the ground helps a lot. Sometimes I hang my phone from a tree branch in a waterproof bag! This can change your signal from 1 bar to 3 bars.
Weather effects: Cloudy, humid days cut my hotspot range by about 30%. I plan for this with my camping mobile hotspot setup now.
Check coverage: I always look at coverage maps for all major carriers before booking a site. Sometimes I switch carriers for a trip. I keep an extra SIM card in my camping kit just in case.
Dedicated devices: If you camp often, get a special hotspot device. My Nighthawk M1 mobile router works much better than my phone. It handles more devices and doesn’t drain my phone. Best Buy offers a great selection of mobile hotspots suitable for camping at various price points.
The main point: Mobile hotspots work well for camping if you plan ahead. A little homework saves you from waving your phone in the air looking for signal!
Essential Equipment for Your Camping Mobile Hotspot Setup
My first tech camping trip taught me a hard lesson. I thought my phone alone would work for emergencies and weather updates. I was so wrong! After that weekend of poor signal and dead batteries, I built a camping mobile hotspot setup that really works.
Start with the right device. I switched from my phone to a dedicated mobile hotspot. The Nighthawk M1 ($250-300) is my favorite, but the Alcatel Linkzone works well for about $100. Dedicated hotspots handle multiple connections better without killing your phone battery. For a comprehensive overview of essential camping gadgets, check out our [Best Camping Technology Gadgets of 2025].
Power is crucial off-grid. My hotspot died on day two of a four-day trip once. Now I carry a 20,000mAh power bank at minimum. The Anker PowerCore never fails me. For longer trips, I add a foldable solar charger. The BigBlue 28W panel keeps my camping mobile hotspot setup running on sunny days. To explore various power solutions for your devices while camping, refer to our [Power Solutions for Devices While Camping].
Signal boosters change everything. I got a weBoost Drive Reach ($500). Yes, it’s pricey, but it boosts my signal 3-4 times in remote areas. Even a basic $100 antenna helps. I’ve seen my signal jump from 1 to 3 bars just by adding an antenna.
Protect from weather. A sudden rain nearly ruined my $300 hotspot last summer. Now my outdoor internet device lives in a waterproof Pelican case. I use silicone sealant and weatherproof tape on all antenna connections. Seems like overkill until rain ruins your gear!
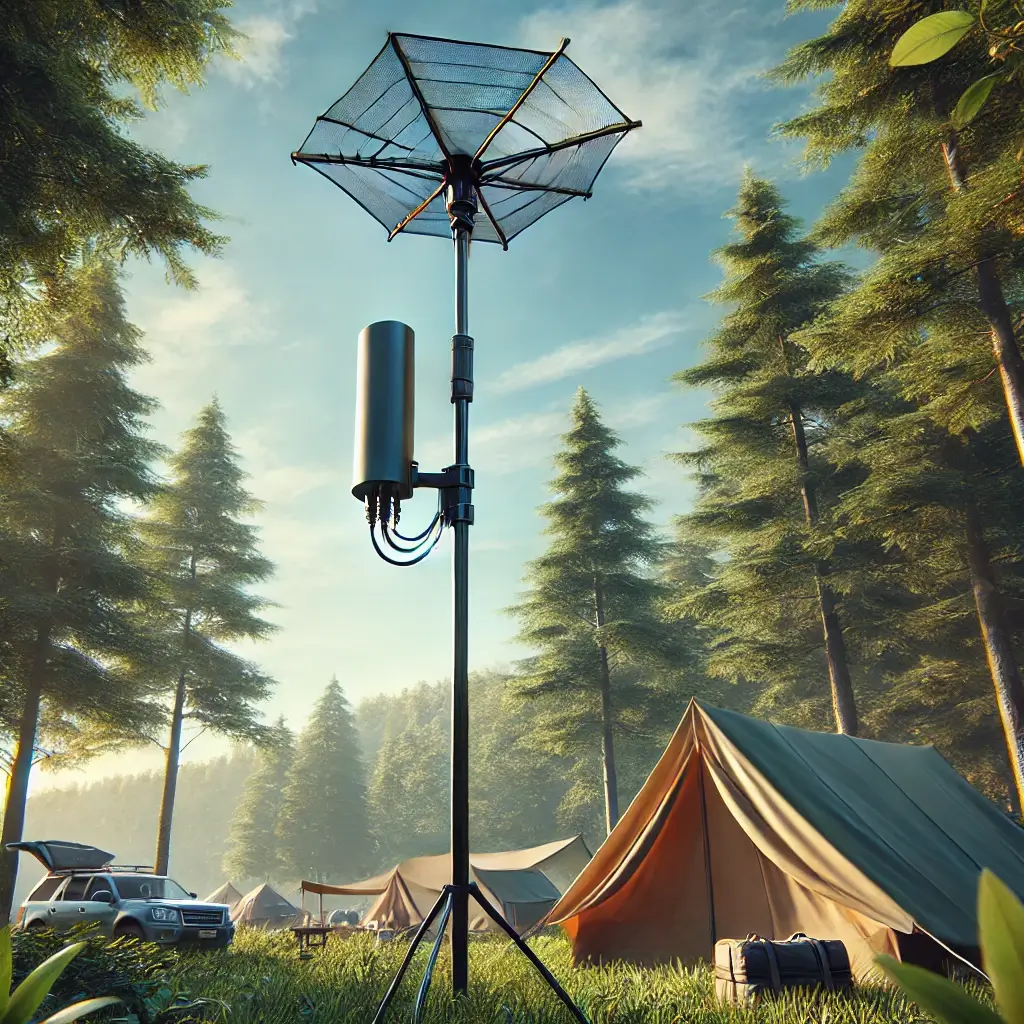
Mount equipment high. Getting your antenna 8-10 feet up improves signal greatly. I use a telescoping pole that extends to 12 feet. Some people attach antennas to RVs, but my pole works great for tent camping connectivity solutions. For RV-specific setups, the community at iRV2 Forums has excellent discussions about mobile internet configurations.
Carry multiple carriers. I keep SIM cards for both Verizon and AT&T in my kit. Different parks have better coverage with different carriers. Before going to Yellowstone, I checked maps and switched to the carrier with best coverage there.
Manage heat. Hotspots can overheat in direct sun. Mine shut down during an important work call once. Now I use a small USB fan and keep equipment in shade. Some people make cooling setups with small fans.
Don’t forget cables and adapters. I’ve been stuck without the right connector too many times. My kit has extra USB-C, Lightning, and Micro USB cables, plus adapters for car power. I label everything because finding the right cable in a dim tent is hard!
With this setup, I get internet where others can’t even send a text. The cost might seem high, but a reliable camping mobile hotspot setup is worth every penny. Start simple and build your kit over time.
Choosing the Right Data Plan for Camping
Finding the perfect data plan for camping used to drive me crazy. On my first longer camping trip, I ran out of data by day three. I had to drive 45 minutes to find a coffee shop with WiFi just to check email. Not the relaxing outdoor trip I wanted!
After years of trial and error, I know what matters in a camping-friendly data plan. Carrier marketing rarely tells the whole story about camping mobile hotspot setup options.
Watch out for “unlimited” plans. Most carriers offer unlimited phone data but strictly limit hotspot data. AT&T’s unlimited plan gave me just 15GB of hotspot data. This vanished quickly during a video call showing our campsite to family. Always check the specific hotspot allowance, not just the total data.
Try prepaid plans for camping trips. Carriers like Visible (Verizon network) and Cricket (AT&T network) offer good hotspot data for $25-50 monthly with no contract. Best part? Activate for your trip and pause after. AT&T’s Prepaid Data Plans are particularly good for short-term camping trips since they’re flexible and don’t require long commitments. These prepaid data plans for camping trips have saved me hundreds compared to upgrading my regular plan.
Don’t trust coverage maps blindly. Before camping at Glacier National Park, Verizon’s map showed “good coverage” near our site. Reality? Barely usable. Now I check apps like OpenSignal or Campendium where real campers report actual signal strength. These are much more accurate for planning camping mobile hotspot setup.
Consider sharing data when camping with others. My wife and I use a T-Mobile family plan with 40GB of shared hotspot data. This works better than 20GB each since our usage varies. Some days I need more, some days she does.
Check throttling policies. When I hit my data cap with Sprint (now T-Mobile), speeds became unusable. My current plan throttles to 3Mbps after the high-speed cap. This still works for basic browsing and email. Always ask: “What speed do you throttle to after reaching the data cap?”
Watch out abroad. On a camping trip to Banff in Canada, my “North America” plan didn’t include hotspot use across the border. I got $80 in roaming charges! Now I call my carrier before cross-border trips to confirm what’s covered.
Look at data-only plans for dedicated hotspots. I found a 100GB data-only SIM for my Nighthawk that costs $55/month – much better than adding hotspot data to my phone plan. Companies like Calyx Institute and FMCA offer high-data unlimited data camping plans many people don’t know about.
Time your trips smartly. I had issues when camping at the end of my billing cycle with little data left. Now I schedule longer trips right after my data resets, or add a temporary boost if needed.
Finding the right data plan for your camping mobile hotspot setup is simple if you know what to look for. Track how much data you really use, check real coverage reports, and try temporary prepaid options. You’ll thank yourself when posting amazing campsite photos without worrying about data caps!
Setting Up Your Mobile Hotspot at the Campsite
My first hotspot attempt at a campsite was just putting my phone on the picnic table and hoping. Big mistake! I ended up with poor signal and a dead, overheated phone by lunch. After many frustrating trips, I’ve created a camping mobile hotspot setup process that really works.
Start with location scouting. Walk around your campsite checking signal bars on your phone. Test different spots. Sometimes moving just 20 feet makes the difference between no service and three bars. The highest point isn’t always best. I once found better signal in a small clearing than on a nearby hill because mountains blocked the signal differently.
Height helps your hotspot greatly. Getting your device 6-8 feet up improves signal dramatically. I use a simple telescoping pole (like photographers use) attached to my camp table or tied to a tree. Putting my hotspot at the top with a plastic bag holder has turned barely usable signal into solid connections at many sites.
Try different orientations. Most hotspots and phones have antennas that work better in certain positions. I spend a few minutes rotating my Nighthawk until I find the sweet spot with maximum bars. Sometimes turning it 90 degrees adds a bar of signal to your camping mobile hotspot setup!
Protect from weather. A sudden rain shower nearly ruined my $300 hotspot last summer. Now I use a clear Rubbermaid food storage container with small holes for cables and airflow. These clear plastic containers cost about $3-5 and work perfectly for weatherproof internet setup camping. The transparency helps you see signal lights, and the plastic doesn’t block signals like metal containers would.
Manage heat issues. Hotspots get very hot in direct sunlight. After mine kept shutting down from overheating, I now set up in shaded areas with good airflow. For hot days, I use a small USB fan powered by my battery pack to keep air moving around the hotspot. Passive cooling works too – try covering your gear box with light-colored shade cloths or even aluminum foil to reflect sunlight while still allowing airflow.
Secure everything properly. On a windy day in Joshua Tree, my poorly attached setup crashed down and cracked my hotspot screen. Now I use bungee cords, velcro straps, and even tent stakes to keep everything in place regardless of weather. A little prevention saves expensive replacements!
Set up redundant power. My main source is usually a 20,000mAh battery pack connected to my hotspot. As this drains, I have my solar panel charging a second battery. This rotation has kept my camping mobile hotspot setup running for a week without finding an outlet. Use short, quality cables to minimize power loss.
Test before finalizing. Run a quick speed test to get a baseline. I use the Speedtest app, which works well in rural areas. If speeds are below 5Mbps, I spend more time adjusting position before settling in.
The effort of proper setup pays off hugely. At our last family camping trip, others hiked to the camp office to check emails while I had solid connection right at our site. A little prep makes all the difference when setting up your mobile hotspot at the campsite!
Optimizing Your Camping Internet Experience
After dozens of camping trips with tech, I’ve learned having internet is only half the battle. Making that connection actually useful is where the real magic happens. My first “connected camping” attempts were frustrating until I found some game-changing data conservation camping tips.
Schedule your connection times. Instead of running my hotspot all day and draining battery, I turn it on during specific windows – 7-8am for weather updates and 7-9pm for checking in with family. This doubles my battery life and improves my camping experience. I’m more present during the day instead of mindlessly scrolling.
Change your app settings. I was using up my data without realizing my phone was doing background updates. Now I set all apps to “WiFi only” for updates before any camping trip. I also use data saver modes in apps like Instagram and YouTube. These simple changes cut my data usage in half compared to my earlier camping mobile hotspot setup trips.
Download content before your trip. This was a game-changer. I download Netflix shows, Spotify playlists, and Google Maps of the camping area while still on home WiFi. Having offline access to entertainment and maps reduces my actual hotspot usage to just essential communications and weather updates.
Try different browsers. I switched from Chrome to Opera’s data-saving browser for camping trips. It compresses web pages before they reach your device, using up to 60% less data. For very slow connections, I use text-only browsers like Text Mode. They’re not pretty but load super fast when you just need basic information.
Time your usage smartly. Campground connections get very slow around 8-10pm when everyone’s back at their sites. I do any big downloads or video calls either early morning (5-7am) or mid-afternoon when most people are out hiking. The speed difference can be huge – I’ve seen 3x faster connections during off-peak hours with my camping mobile hotspot setup.
Consider a WiFi extender at campgrounds with WiFi. I bought a basic TP-Link extender for about $30 that runs off my power bank. At campgrounds with central WiFi, I’ve connected from 200+ feet away when others couldn’t get signal. Just place it in your tent window facing the WiFi source.
Use data compression tools. I use my phone’s built-in Android data saver features or Opera browser’s compression mode. These tools shrink images and videos on the fly before they reach your device. For older Android phones, apps like Datally worked well (though it’s discontinued now). You barely notice the quality difference, but the data savings are huge for your camping mobile hotspot setup.
Plan around weather. I’ve learned to schedule heavy internet usage for clear, dry days. During rain, my signal strength typically drops by 30-40%. If I know storms are coming, I download important information beforehand rather than struggling with weak signal during bad weather.
Keep realistic expectations. This mental shift was important. I used to get frustrated when video calls kept freezing. Now I plan for text-based communication as the default and see anything more as a bonus. My camping trips became much more enjoyable once I aligned my expectations with the reality of rural connections.
With these tricks, I stay connected when needed while still enjoying the peace of camping. The goal isn’t to recreate your home internet in the woods – it’s to have just enough connection to enhance your outdoor adventure with a well-planned camping mobile hotspot setup!
Real-World Applications: What You Can (and Can’t) Do
After years of camping with hotspots, I know exactly what’s possible with wilderness internet. My first camping mobile hotspot setup gave me unrealistic hopes – I thought I’d video chat from mountaintops! Reality quickly set in. Let me emphasize right away: streaming and video calls are generally unreliable unless you’re fairly close to towns or cell towers—even with the best signal boosters.
Email and messaging work most reliably. Even with weak signal, I can send and receive important messages. Plain text emails almost always go through, even on 1x or 2G speeds. WhatsApp and Signal work better than regular texting in poor coverage areas. They use less data and queue messages to send when signal improves.
Basic web browsing works if you’re patient. News sites and blogs are usually readable, though images load slowly. Using reader-view in browsers removes data-heavy elements and makes pages load much faster. For very slow connections, text-only browsers make even the poorest connection usable with your camping mobile hotspot setup.
Social media varies by signal strength. Text posts on Twitter/X work fine on weak connections. Instagram and TikTok need at least 3+ bars of 4G/LTE to be usable. I now use “lite” versions of these apps, which use much less data. Facebook Lite has been amazing for camping trips.
Forget video streaming with weak outdoor streaming capabilities. Netflix and YouTube rarely work well on camping connections. Even with my signal booster at a site with decent coverage, streaming is usually too choppy to enjoy. Sometimes lowering resolution to 480p or 240p helps for quick weather videos or news clips.
Video calls rarely work well. I’ve only had successful video calls at about 20% of my campsites, all relatively close to towns. Audio-only calls work much better – Zoom and Teams both have dial-in options that use minimal data. For important meetings with my camping mobile hotspot setup, I stick to audio and briefly turn video on just to say hello.
Maps and navigation work better than expected. GPS works without cellular data, but downloading offline maps before your trip is essential. Google Maps lets you save large areas for offline use. Hiking-specific apps like Gaia GPS and AllTrails also offer excellent offline maps for campers and hikers. Once maps are downloaded, my phone routes me around without using any data. This has saved me countless times exploring around campsites.
Weather apps are camping essentials. Most weather apps use little data and provide crucial storm updates. Radar images use more data, so I download those on good signal and check text-based forecasts when connection is spotty. Weather Underground works better than others on weak connections.
Work apps vary widely in usability. Email and chat apps like Slack usually work fine with remote work camping internet setup. Uploading or downloading large files is painfully slow or impossible. I missed deadlines before learning which work tasks are camping-compatible. Google Docs works offline if you enable that feature beforehand.
Gaming rarely works with camping hotspots. The lag is too high for competitive games. I can play turn-based games and do daily check-ins for mobile games, but real-time games are frustrating. Chess apps and word games are about all that work well on a camping mobile hotspot setup connection.
Understanding these limits helps me plan better and avoid disappointment. The key is setting right expectations and downloading important content before your trip. Mobile hotspots aren’t about recreating your home internet – they’re about basic connectivity while enjoying nature!
Conclusion
Setting up a camping mobile hotspot setup doesn’t have to be hard or expensive! With the right gear, good planning, and our tips, you can balance nature and connectivity on your next outdoor trip. Remember that even the best camping mobile hotspot setup may struggle in very remote areas, so always have backup communication plans for emergencies. Have you tried setting up a mobile hotspot for camping? Try these techniques on your next trip and see how much better it works!

